
With Python you easily have a whole group of small test programs within a single folder, which provides a simple ‘sandbox’ environment to try tests and experiments that go beyond what can be done in the Idle REPL. This page describes how to create Kotlin ‘sandbox’ project that provides a simple solution to creating Kotlin test programs and projects with mimimal effort.
- Preparation.
- Make Your Project
- Create Project
- Add git & Commit
- Hello World!
- move to sub project
- Clone The ‘Sandbox’
- Adding a New Project.
Preparation.
You need to install Intellij following the instructions from JetBrains.
Installing Intellij also requires installing a Java SDK (Software Development Kit), and this step will also be required. The instructions for installing Intellij also provide for installing the SDK. There are some play tutorials from JetBrains and you can try those before proceeding if you wish.
Install Gradle if you do not already have gradle installed.
Install Git if you do not already have Git installed.
Create Project.
Open Intellij. Then ‘File/New Project’ from the ment..

From the menu that appears from ‘New/Project’, make the selections as shown to the left. Note that a Project SDK must be able to be selected. If there is no value available for Project SDK, go back to the JetBrains instructions for installing Kotlin and the Java SDK, then once that is covered return here, and start again.
The next screen has ‘Group ID’, ‘Artifact ID’ and ‘Snapshot’. You can leave groupID blank, and Snapshot at the default value, then pick a name for ‘ArtifactID’ which can match the name of your project (I use Sandbox as a project name). It a name, not a file name, so no extension. It is preffered to use no spaces, capitals or special characters for actual artifacts that will be published, but if you do not plan to publish the code as a library feel free to use capitals where it helps readability.
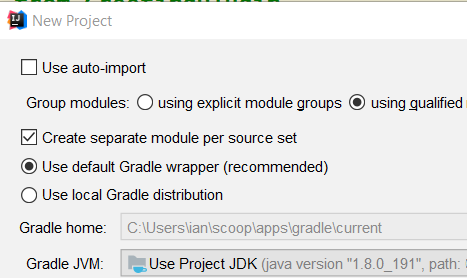
Now the ‘gradle’ screen will appear as shown.
You can leave all settings on this screen as they are (or as shown to the left).
Then select ‘Next’ to jump to the next ‘new project’ screen which has a ‘Finish’ button, so you can see you are at the last step. The ‘Project name’ will match what you used for artifact ID, and the ‘Project location’ will be the a new folder matching the project name in default folder for Intellij. Caution: if you wish to change the location, you can use the ‘elipses’ to the right to select a new folder, but you will need to retype your project name at the end of the ‘Project Location’ field. If you forget to at the name for a new folder for your project, the result will be a mess. The project needs its own folder, and you the name of the projects own folder in the ‘location’.
The same name will be added to the other paths automatically, and you can leave the project format as the default (.idea) and press finish. You should get a warning about the folder for the project needing to be created, and after you press ok the project will be created.
Add Git, and Commit.
Why?
This ‘git’ step is optional, but it means if anything ever goes wrong, you can recover the previous point of the project, and it is highly recommended for that reason alone. It also means you can try things and restore after the experiment, keep alternate versions of any the project, and allow each experiment to live in its own branch. Plus, you can back up your work and/or transfer to another computer any time you wish. The wins for having git just keep coming.
Add .gitignore.

It is best to create a git ignore file before even starting with git. This saves putting files into git that require being later removed. The concept is to not keep things which can be automatically generated in the repository, and instead concentrate on the things you would bother to backup if making a backup.
The new project should still open in Intellij. You should now have the file structures as shown to the left, with the exception of the .gitignore file which should now be added. A git ignore file specifies what to exclude from being saved with git.
Right click on the very top folder (‘Sandbox’ in my project) in and select new/file. Enter the name “.gitignore” (the “.” at the start is requred!) and press enter.
Add the file contents:
.idea/
.gradle/
build/
This will exclude the .idea, build and .gradle folders from being stored in the git repository.
Converting the Project Folder to a Git Folder
Check to see if the ‘Terminal’ window is on screen once the project is open. Selecting ‘View/Tool Windows/Terminal’ will toggle this terminal window being displayed, as will the Alt-F12. Click inside the terminal window and type the command ‘git init .‘ and press ‘enter’. Typing ‘git init .’ will initialise a git repository in the current folder (the ‘.’ is needed to specify use of the current folder).
Then enter a new command of “git add *” to add all files (other than those specificed in .gitignore) to the repostiory.
Commit. And Commit Often!
You can now perform an initial commit. A commit is like takeing a photo of how things are so the computer can restore to this point. Or, you can simply check
what has changed between now and when the snapshot was taken. The rule is to commit often. Each commit needs a message so you can recognise what the snapshot is about.
The commit can be done from within Intellij. Salect VCS/Commit or Control-K (So commit is spelt with a ‘K’ now?). You will need a commit message and you are done.
Hello World!
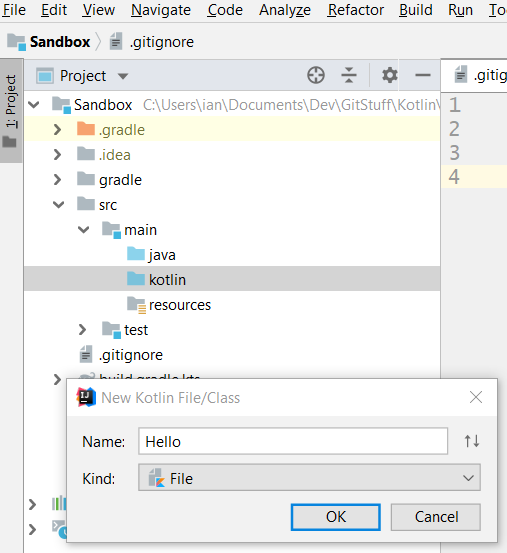
Right click on the ‘kotlin’ folder within src/main and select ‘New/Kotlin File/Class‘ and then the name of your file. The extension is not needed, it will be added automatically.
You may be prompted to add the file to git. It would be normal to add a new file to git. Then add the code below to the new file, and check that a small green arrow then appears in the ‘gutter’ next to the line with the word ‘fun’. Selecting this arrow should run the program and show ‘hello world’
fun main(){
    println("hello world")
}
Right click on the ‘Kotlin’
fun main(){
println(“hello world”)
}

you should now a simple working program. If the green arrow did not appear or there is some other problem, then although you can dowload the git repository of this project, the problem is most likely that the java environment is not correctly installed on your computer.
Convert To Subproject.
Create the Subproject.
The goal is to have too levels of sub-project so sub projects can be grouped. The first level is the group, and the second level the project within that group. At the top level (‘Sandbox’ in this case, right click and create a ‘New‘ ‘Directory‘ folder called ‘KotlinJVM’, then right click on that new folder and add a ‘New‘ ‘Directory‘ folder called ‘Hello’ (or some other name of your choice).
Move the code
Right click on the ‘src’ folder and select ‘refactor’ then ‘move’ to bring up the dialog box and to move the src folder to the new hello sub project. You can use the elipses at the right of the dialog box and use a tree view to locate the new ‘hello’ folder.
Tell Gradle About the sub project.
Now locate the file “settings.gradle”. At the time this page was created, the default for Intellij was still a ‘groovy’ settings file, so the first step is to convert this file to a Kotlin file by using ‘refactor’ /’rename’ and adding a ‘.kts’ extension to rename the the file “settings.gradle.kts”. There is a little more to required for this file so open the file and edit it to have double quotes around ‘sandbox’ in place of single quotes, then and add the include so the contents of this file now is:
rootProject.name = "Sandbox"

include("KotlinJVM:Hello")
.
Tell Gradle How to Build Sub Projects.
“build.gradle.kts” files (or “build.gradle” for groovy files) tell gradle how to build projects. This project, as created by Intellij, came with a build file, but it only describes how to build the top level project. Each project and/or needs it own instructions, but we can have on build file build provide instructiosn for any number of subprojects. Firstly, our build is for KotlinJVM projects, which will all be in the KotlinJVM folder, so the current ‘build.gradle.kts’ file needs to be moved to the KotlinJVM folder. Secondly, we wish to build subprojects, not the KotlinJVM folder itself, so we place a ‘subprojects{}’ block around the the repositories and dependencies blocks, and add the an ‘apply(plugin=”kotlin”) to the subprojects, and we are then done.
import org.jetbrains.kotlin.gradle.tasks.KotlinCompile

plugins {
    kotlin("jvm") version "1.3.31"
}

version = "1.0-SNAPSHOT"

subprojects {  // new line!

    apply(plugin="kotlin") // new line

    repositories {
        mavenCentral()
    }

    dependencies {
        implementation(kotlin("stdlib-jdk8"))
    }
} // new line - end of block
tasks.withType<KotlinCompile> {
    kotlinOptions.jvmTarget = "1.8"
}
Verify & Commit again
It is now time to check hello world still works, but running again using that ‘green arrow’ and then commit. All is now complete. This is the Sandbox repository, ‘newSandbox’ branch.
Clone Sandbox Reposity.
Even if you completed all the steps above, it still can be useful to clone the Sandbox repository, as it does contain more examples than the code above. All the code above can be found in the NewSandbox branch. Simple follow this link and press ‘clone’.
Adding a new project.
First clone the Sandbox repository. Then select the ‘hello world’ branch. Within Intellij, right click on the ‘Hello’ folder (within KotlinJVM folder) and select ‘copy’. Then right click on the KotlinJVM folder and select ‘paste’, which will ask for a ‘new name’ for your new project. Then go to the ‘settings.gradle.kts’ file and add a new include for your new project.
The new project will have a copy of ‘Hello.kt’ which you will normally wish to rename. Then make a test change and run the program (gradle may need a refresh first).
All done! Probably worth doing a commit before starting on you experiments 🙂
