
The standard way to start a kotlin project is as a jvm project. Perhaps it shouldn’t be, as starting as a multiplatform project is just as simple, and provides more flexibility.
At this time, there is no way to automatically create a jvm project as multiplatform, without already selecting extra platforms, but it is very quick to convert a standard project to multiplatform, and it does not even require extra folders or files to be multiplatform from the outset.
- Starting from the hello world
- Adding a test to the ‘hello world’
- Start with Common or JVM?
- Main -> jvmMain
- Adding Common Code
- Principles of Mulltiplatform.
Starting From Hello World
This explanation uses Intellij IDEA, and it is assumed Intellij is installed and that the reader has previously developed Kotlin JVM or JS projects. The starting point is to start a new project/Kotlin jvm-console application, using the gradle-kotlin build system.
Another way to view or start from the starting point is from git repo for this project, and the ‘Initial_Hello‘ branch.
This should give a hello-world sample program. Currently, the project created in this way is ready to add tests, but does not include tests. The program can be built and then run using the ‘green’ arrow on the edit screen of the main code.
Step 1 Add test and check
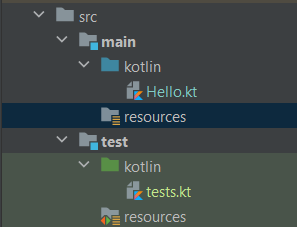
I added a function to the hello module, ‘name’, called the function from the main function,
and then added simple test.
I then ran main and the test using the gutter icons.
Note, the resources files here are not needed, nor used at all by current code.
Start With Common or JVM?
A JVM project could convert main to either commonMain or jvmMain. Which to choose?
It turns out that a platform specific module is necessary, as that is where ‘fun main()’ must reside. Each platform gets its own ‘fun main()’ in multiplatform.
main -> jvmMain
I then renamed the ‘main’ to commonMain and the koltin plugin from jvm to multiplatform.
Once the my original typo in ‘multiplatform’ was corrected, build.gradle.kts looked fine. Running a build yielded:
e: C:\Users\ian\Documents\Dev\playarounds\SampleApplication\build.gradle.kts:24:5: Unresolved reference: implementation
Implementations cannot be declared in the outer scope, as they need to be linked to a specific combination of platforms. Step 1 is to comment out the implementations, to have clean builds until they can be reapplied correctly. Next the original
//tasks.test {
//    useJUnit()
//}
Will generate Unresolved reference: test as an error and also needs to commented, as again this will need to be able to be platform specific, This provides the error:
Please initialize at least one Kotlin target in '<Project> (:)'.
This requires a Kotlin block, a platform, in this case jvm.
kotlin {
    jvm {}
}
Intelij complains about the ‘jvm’, but after a gradle build, the error will be resolved. (After a refresh and then waiting).
All is clean at this point, but there is no code in the program. There are two choices. Rename the folders, or manually specify the current folders over ruling multiplaform defaults.
kotlin {
    jvm {}
    sourceSets {
        val jvmMain by getting {
            kotlin.srcDir("/src/main")
        }
    }
}
If the code does not highlight as source code, and/or run using the green gutter icon, it can be the intellij as become confused as to which folder is source. Exit intellij, delete the .idea folder, then reopen the project and perform a gradle build. This will work using these settings, once old settings were removed from intellij.
The programs now runs, so next up: tests. The same process is required for getting tests to work, with one extra step. The junit dependency is also required. Now the kotlin block in build.gradle.kts will look like:
kotlin {
    jvm {}
    sourceSets {
        val jvmMain by getting {
            kotlin.srcDir("src/main")
        }
    }
    sourceSets {
        val jvmTest by getting {
            kotlin.srcDir("src/test")
            dependencies {
                implementation(kotlin("test-junit"))
            }
        }
    }
}
With these changes alone, everything should now work, including tests. Anything that is not working will only require checking that this has been implemented. This includes being able to run the app and the tests from within intellij, using the green gutter triangles. gradle build will also automatically run the tests. If all is not working within intellij, try closing the project, deleting the ‘.idea’ folder again and reopening.
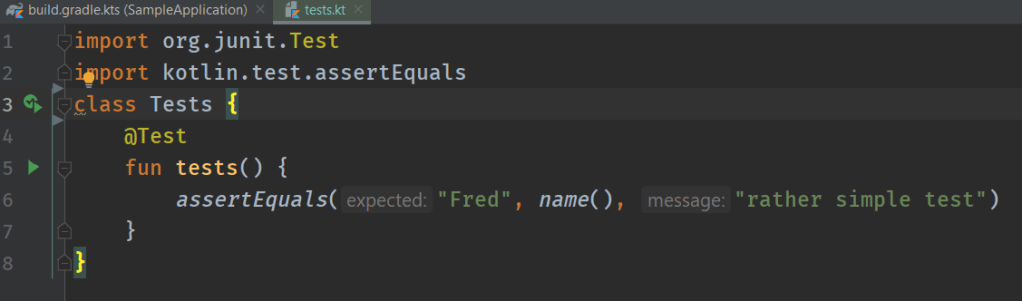
Note green ‘arrows’ to between the ‘3’ for line 3 and the code, and again between the 5 for line 5 and the code.
This examples has the ‘kotlin.srcDir’ settings with add the specified folder to ‘jvmTest’ and ‘jvmMain’. These folders now be renamed to the standard names if desired, and then the ‘srcDir’ entries would no longer be needed.
Adding a Common Main.
The next step is to make some use of having multiplatform.
File Reorganise.
The easiest way is to duplicate the ‘main’ folder. I first renamed to ‘jvmMain’ and then used copy within intellij and pasted onto ‘src’, and renamed the paste ‘commonMain’.
Next I renamed the file in jvmMain from ‘hello.kt’ to ‘hellojvm.kt’ to avoid name collisions at the module level.
Now to modifying the source.
CommonMain: hello.kt
I renamed fun ‘main()’ in commonMain/hello.kt to be ‘commonMain()’, and changed fun ‘name()’ to now be an expect, so now the file is:
expect fun name(): String
fun commonMain(){
    println("hello world ${name()}")
}
JvmMain: helloJvm.kt
Then I changed jvmMain/helloJvm.kt so the ‘main()’ calls commonMain() and added the ‘actual’ keyword to the the ‘name() function.
This now reflects a real multiplatform app. The app always starts in platform specific code to enable any platform specific setup, before calling the actual main code. The main code can make use of platform specific features as needed, but by classes, functions or data declared as ‘expect’ in the common code, and fulfilled as ‘actual’.
Next: extended example enabling arrow.
