
Available in the Android SDK (SDK Tools) and therefore also in both Intellij IDEA and Android Studio, the Android emulator allows apps be run on a computer used for development in place of running on a phone.
This page describes how to run the Android emulator from Intellij IDEA/Android Studio or from a the command line.
Intellij IDEA/Android Studio Setup
Open Intellij IDEA/Android Studio and allow the Gradle build to complete. The Android tools options (main menu -> Tools -> Android) will not be available until a successful build has been completed.
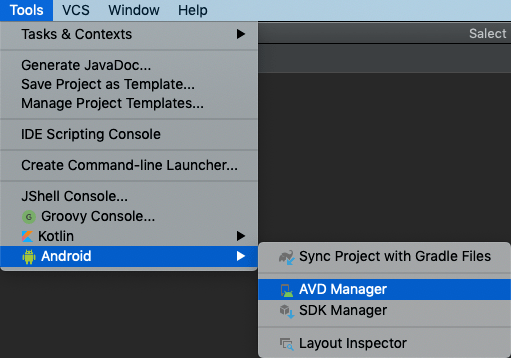
Set up an Android Virtual Device (AVD) to run in the emulator — see Create an AVD in the official docs. Go to the AVD Manager in Intellij/Android Studio (main menu -> Tools -> Android -> AVD Manager).
Create a new run configuration or edit and existing run configuration.

Press the “+” in the top right of the Run/Debug Configurations dialogue. Select Android App when adding a new configuration. Update the Name and in the General tab, select project Module from the dropdown list (in this case is was called ‘app’).

In the Deployment Target Options section, select the Deployment Target — from the drop down list of targets, select Emulator.

And select the Android Virtual Device (AVD) that was previously created in Prefer Android Virtual Device. Apply changes and exit.

Finally, run the emulator.

How To Install An APK On An Emulator
If an Android APK has been supplied i.e. you are not building an app yourself, start the emulator with the required Android Virtual Device (AVD), either from within your IDE of choice or from the Terminal command line (see below), and then drag-n-drop the supplied APK onto the running emulator. The APK will be installed on the emulated device.
Optional Command Line Instructions To Start The Emulator
It is possible to start the emulator for a specific Android Virtual Device (AVD) for specific DNS’s from the Terminal command line. See the Network address space discussion in the Set up Android Emulator networking in the offical docs.
Pre-requisites
- Any local dependencies for your app have been successfully built
- Successful Android app build
- A suitable Android Virtual Device (AVD)
Specifying Specific DNS Values
See the Network sub-section describing the -dns-server option/switch in the section entitled Commonly used options.
If specifying specific DNS values, first find the desired DNS values. By default, the emulator tries to detect the DNS servers you’re using and sets up special aliases in the emulated firewall network to allow the Android system to connect directly to them. Use the -dns-server option to specify a different list of DNS servers.
On macOS go to:
Apple -> System Preferences -> Network

select a specific service e.g. WiFi -> Advanced

-> DNS -> note down the first 4 (FOUR) DNS Servers listed

Navigate to the location where the Android SDK emulator was installed on your device (laptop/desktop) and look for the emulator folder. For example, on macOS when the Android SDK was installed using Homebrew, that location looks something like this:
/usr/local/Caskroom/android-sdk/4333796/emulator
Open a Terminal and start the emulator for the desired AVD from the command line WITH specific DNS values:
./emulator @Pixel_2_API_28 -dns-server 2606:4700:4700::1111,2606:4700:4700::1001
Or WITHOUT specific DNS values:
./emulator @Pixel_2_API_28
Return to your IDE of choice and run the specific run configuration created previously (see above) for the emulated AVD you just started.
😄 🎉 😄
